Wrist Pain Relief Tool -
How To Build Your Own
I use mine on my forearms all the time. After a long week of working on human bodies with my hands, this simple tool undoes all the tension in my forearm muscles, and thereby releases any wrist pain I may be having.
Fortunately, since I use this tool regularly, I seldom have any wrist pain anymore.
Once you build this wrist pain relief tool, you may want to go to my main Wrist Pain Relief page (click here) and see the techniques I recommend. You can then apply the wrist pain tool to do the techniques I show you.
Click directly to any pain relief video on this page:
Video 1,
Video 2 .
Video 1 of 2 -
Wrist Pain Relief Tool
How To Build It
Click directly to any pain relief video on this page: Video 1, Video 2 .
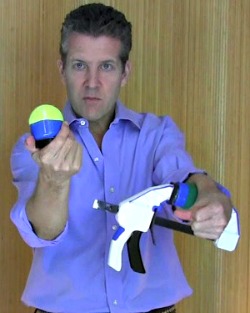
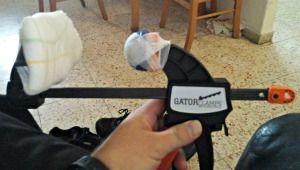
A "trigger clamp" is the main thing you will need to begin making your tool.
The white and blue wrist tool I use in the videos is a Dewalt 6 inch, Large Trigger Clamp (click here to see on Amazon.com). This should be a good size for women and small to medium sized men. that woodworkers use when they are gluing 2 pieces of wood together. You can buy them a any large hardware store or at locations that sell woodworking equipment.
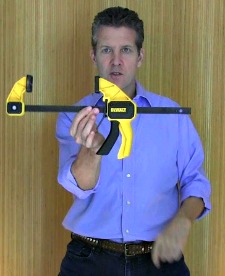
The yellow and black model I use in the videos is a Dewalt brand, size Large, 12 inch trigger clamp. I can't find the 12" Dewalt model on Amazon, so here is an IRWIN 12-Inch Large Trigger Clamp (click here to see on Amazon.com) of comparable price and quality.
The other things you will need are:
1. a roll of two sided tape
2. a small square or rectangle of wood
in my video I use a small floor sample from the flooring department
3. a piece of padding to stick onto the wood
in the video I recommend a carpet sample from the carpet department or a piece of spare foam padding you may have around your home.
4. some plastic container tops from various containers at your home or from a craft store. These will have to be cut and modified to hold a ball that will be stuck on one side of the clamp.
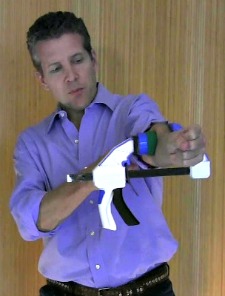
Once you have all your supplies.
First, with your 2 sided tape, stick the padding or carpet sample to one side of the piece of wood.
Second, with the 2 sided tape, attach the piece of wood to the black pad on the non-handle side of the clamp.
Third, modify a plastic container top so that it fits your sports ball snugly about 1/3 of the way up the ball. Place the 2 sided tape on the inside bottom of the modified plastic top and firmly press the ball into the top.
Forth, using the 2 sided tape, attach the bottom of the modified plastic top to the black pad on the handle side of the clamp.
You may have to play around a bit to get things secure and comfortable for you to use, so be open to making little adjustments.
That said, you will now have in your hands an extremely powerful tool to fix your own wrist pain whenever you need it.
Video 2 of 2 -
Wrist Pain Relief Tool
How To Use It
Click directly to any pain relief video on this page:
Video 1,
Video 2 .
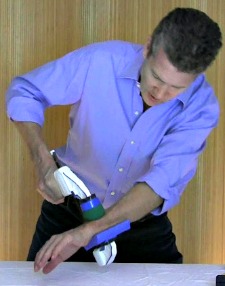
This wrist pain relief tool uses the press-hold-move technique just like I use throughout this website. The advantage is that the tool does all the hard work of pressing. Many people have a difficult time pressing deeply enough into the bellies of their forearm muscles.
This tool can get the job done on the deeper and more superficial muscle groups more quickly and with less effort on your part.
The steps are pretty simple...
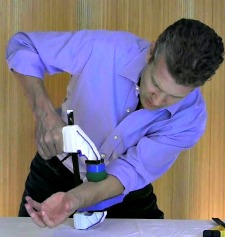
STEP 1 - Do the press-hold-move technique using this wrist pain relief tool on the muscles in the belly of your forearm.
You can alternate between:
a) Opening and closing your fist
b) Bending your hand forward and back with your hand open
c) Bending your hand forward and back with your fist closed
Start about an inch down from the crux (bend) in your elbow. Investigate for tight painful tissue by applying pressure with the ball attachment. When you find tight tissue do the press-hold-move technique. If the tissue releases right away then move down or over to another spot. If after 10 or 20 seconds the tight tissue has not let go, then move to another spot and revisit this stubborn spot later.
Only do about the top 2/3 of the belly of your forearm, from your elbow down to 3 or 4 inches above your wrist. There isn't much muscle tissue in the lower part of your forearm, so don't waste you time doing too much there.
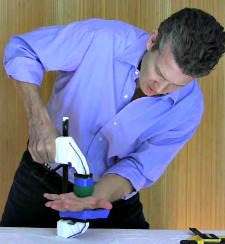
STEP 2 - Now we'll do the other side of your forearm, we'll call it the "top" of your forearm. You will do the same press-hold-move technique here as you did on the belly of your forearm.
a) With fingers spread wide, raise and lower your hand toward the top of your forearm
b) With fingers spread wide, palm flat, move your hand from side to side
c) With fingers spread wide, tilt your hand from side to side
But on the top of your forearm you'll want to be aware of that a big nerve called your Median Nerve runs down the upper middle of the top of your forearm, so if your pressure creates a more "nervey" feeling than the feeling you have when you press on tight muscle tissue just move over 1/2 inch to one side or the other in your search for tight tissue.
Unlike the belly of your forearm, I found benefit in doing the press-hold-move technique with the wrist pain relief tool down to about an inch above the wrist. There are muscles in there that can really benefit from using this wrist pain relief tool.
STEP 3 - The Palm of your hand is next.
You may want to start with a bigger ball, like a tennis ball first, and maybe just using that will be fine. A racquet ball is also fine. Be a bit careful using small hard balls on the palm of your hand. I'd rather have you take a little longer using a bigger softer ball than be too aggressive on your hands.
the wrist pain relief tool that he built all by himself.
He reports that it's working great!
This Free Pain Relief Website
By Clicking On Your Favorite Icon Below:
Add Gary Crowley to your Google Plus Circles -
Google+ (click here)
Copyright © 2011 - 2022 DiyJointPainRelief.com


